Monday, September 26, 2011

Mid Century Modern Table, by Lane

Well here it is...My first attempt at refinishing furniture...I found this baby at GW for $13.02 it was originally 19.99 but they were having a 40% off all furniture special...WOW
I saw it, grabbed it and carried it with me...I knew I didn't dare leave it behind!!


Like the "CREEPY" picture of Autumn?   More about that later!!
As I was headed to the check out line, some kind lady stopped and asked what I was going to do with it. When I told her my plans, she asked me if I had refinished furniture before...The truth is...For a moment I wanted to say yes and act,  just for once like I knew what I was doing...but true to my nature,  I was totally honest.....


Which was awesome, because she called her husband over who apparently does it all the time, he told me how he would go about getting this table back to it's former glory!  


Yes kids...It does always pay to tell the truth!! :)


So here is what it looked like when I bought it home that day...It had one real dark spot in the center of it...


Along with some white spots where the finish was mostly gone.....
The gentleman at the GW told me to use Formby's Furniture Refinisher to take off the finish...
It worked very well on most of it but did nothing to get the dark stain out...
So I tried bleach and a lot of sanding but only managed to lighten it some, I couldn't make it truly go away...
Afraid of ruining it, I decided enough was enough, and set it aside to stain it the following day....
Off I went to watch Autumns Volleyball game...While I was away two of my hens got in the house and ...
YOU ARE NOT GOING TO BELEIVE THIS ...
One of them...well...how shall I say this... LEFT HER MARK on my little table...and if that wasn't bad enough she had been eating Blackberries ...I went back to sanding... :( 


This is the stamp on the bottom of the table

I got MOST the "Chicken Mark" out and was feeling a little discouraged...
When a thought suddenly came over me that made me smile....


Whoever owned this table first left their mark on it...maybe I had no right to take it away...It's part of it's history....as for my "mark", you really have to know where to look for it...But it's there...My little bit of history!!  :)


I stained it with a light walnut finish after conditioning it with Pre-Stain.  I was planning to put a Polycrylic finish on it but my husband talked me into using wax instead...


All and All I think it turned out pretty dang good ...If I may say so myself...the dark spot is hardly noticeable  and the contrast between the Oak boarder and the Walnut is truly gorgeous!!...


I just hope the wax is good enough to protect it from anymore "accidents"!!
Well that's my story...
Thanks for listening.  :)
I will be linking up to many of those wonderful parties on my side bar!
Denise


Wednesday, September 7, 2011

Garden Art from Up-cycled Dishes

Finally ...Here it is...(Now that Summer is about over)...My long awaited tutorial on how to make.... dat-ta-da-dat-tada... Glass Garden Flowers...YEAH!!


Don't they look great!?!  This project probably never would have happened if it wasn't for my two accomplices...(Who are far more organized than I)!


Love this one!!

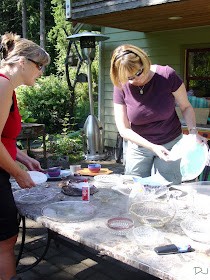
So here's how it all came to be...after another Visit to Dragonfly Farms...We were all inspired and started gathering up plates and glassware at the G.W. and garage sales...anywhere we could find cheap goods!


We set them, all out on my table and started layering dishes...trying all sorts of different combinations until we came up with the ones we liked...

Next step was to drill the holes...we had decided to use draw pulls for the centers, so we drilled our holes the appropriate size to fit their screws....We did break a few glass dishes so practice with a spare.  :)  What we learned was to make a "guide" hole with a smaller drill bit and then re-drill with the larger one. ...Also there is a fine line between to much pressure and not enough.  Oh yes a little water in the bottom of the dish also helps!


The screw that came with the draw pulls were not long enough...so after a ton of help form the nice guys at Home Depot we purchased these long ...Hmmm..I have no idea what they are called...but they are like a long screw with no head...instead you put a cap on them...Then after assembly we cut them off. 


For the stakes we bought 10 foot long pipe and cut them with the hacksaw....Now that was fun...sparks were flying everywhere!
Anyway we drilled a hole through both sides, for the long screw and then gently bent the ends so that the flowers would face upwards.

We assembled each one how we saw fit...Using washers to help steady the dishes.  The two above photos show how we stacked them. 


They took way longer to make than I had planned...but next time should go faster...now that we know what we are doing!!  (Although it was the drilling that seemed to take forever)!
But...
Don't they look great!!


This one reminds me of a dandelion!


My girl friend brought the plates...something I will look for next time...they added so much color!


This is one of my favorites...but then again I like them all!


We used a silver basket for the base of this flower...I will be looking for more of these too!!!


Well there it is ... My tutorial on how to make Up-cycled Garden Flowers...
Now its your turn!!
Just think what Great Christmas present they would make!!
If you stop by...leave a message...I would LOVE to hear from you!!
Denise
PS:
(I will be linking this to many of those awesome parties on my side bar)!!

PLUS>>>