Monday, July 30, 2012

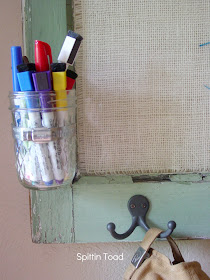
Country Chic Dry Erase Board

Since I opened up a little space in the local variety mall I have been hitting at least a few garage sales every weekend.  I honestly am getting concerned, that I might becoming a garage sale addict....But it sure is fun!!!  :0

Last weekend, when I was out with my girl friend Kelley, I picked up two old windows...It turned out they were from an old classmate of mine...Anyway she had five for sale but I only bought two because I wanted to make sure I would use them....Now I wish I had purchased more!!


I knew I wanted to turn them into some kind of message board and after taking a family vote, it was decided to make the first one a white or dry erase board.  My original plan was to spray paint the back white, but my husband cautioned me, that the old glass was very dangerous when it broke, and that I should probably glue some fabric or something to the back...to help keep it together...just in case...


What a brilliant idea...I thought!!!

Burlap was the perfect choose for such an old window...it has that great country flavor!!
So after washing the window I hurried on down to our fabric store to pick up some light colored burlap...


The lady at the stored showed me how to cut burlap so that it was square.
(Maybe you already know this but I think it's pretty cool)!


You measure it, pull the thread out and that's where you cut...burlap is a bit shifty so you simply stretch and pull it into shape.
I tried to cut my piece just a little smaller than the window pain...that way you could see the frayed edges.


Next step was to cover the window pane with Mod Podge and then lay the fabric down...Easy Peasy!!


After waiting for the first coat of Mod Podge to dry, I added a thick second coat making sure it filled all the little squares in the fabric....  I then played with my poor puppy dog who like usual was such good company!!  :) 


I added the hooks and the jelly jar (pre-drilling the holes first).


And here it is hanging in our hallway with all my sons hats.  :)
Yes...I will change the message but I thought the named worked for this piece!!

Thanks for stopping by!!
Denise

(I will be linking up to many of the parties on my side bar)!!


Thursday, July 19, 2012

How to Transfer a Printed Image Using Mod Podge


I went out Garage Salin...(Is that a word)? last weekend with a girl friend of mine, that I hadn't seen in WAY to long!  It was so much fun ...just like old times only the kids weren't with us and we were no longer looking for Barbie stuff and GI Joe's.  :)


Anyhow I got this little table or plant stand for only $2.00 although it was in great shape it did need to be "jazzed up a bit...maybe I should say "Sabbyed" up.  :)

Soooo...


I painted it BEHR's "Whisper Yellow".


I then zipped on over to one of my favorite Blog:

And looked for a design for the top.  It was between this and a lovely old rooster but in the end the Bee Hives won out.


I tried several different way to transfer the design ...first I tried to print it on wax paper...Wow what an inky mess!! :(   Then I tried printing it onto printer paper and wetting the back side to get the ink to transfer....
another MESS...


In the end the method that worked for me was to:

Put down a thin layer of Mod Podge directly onto the stool

Then I carefully laid the image face down where I wanted it ...making sure there were no wrinkles.
(Did I mention you need to flip the image for this method)?

Anyway after it was down I rubbed the paper with my fingers to make sure it was  stuck real good...(That sounded kind of red neck..."stuck real good"!  :)
Then I peeled the paper off...now all of it did not come up, so I let it dry and sanded it lightly with sand paper until I had the look I wanted.


After a light distressing I painted over the yellow (Not the Image) with a very watered down mixture of brown and black acrylic paint and quickly wiped it off...
I then splattered a little paint here and there to give it that aged look....


Not bad for a $2.00  Plant Stand!!


I will be linking up to Brag Monday for the first time...  :)
At the:

The Graphics Fairy

Please do give her a visit along with all the other link parties on my side bar!!
And as usual...
Thanks for stopping by!!
Denise

Wednesday, July 11, 2012

Gardening: Easy Planters using Succulents


One of my all time favorite plants are Succulents...They are so easy to grow and fun to stick in any little container...Limited only by your imagination!!


Earlier this spring I broke my very favorite coffee  mug or maybe I should call it my favorite garden mug...It was the perfect size for a big cup of Joe while happily weeding in the wee morning hours...even the colors were perfect...so cheery and gardeny...sigh  :(


Anyway I just couldn't throw it out, so after gluing it back together I filled it full of dirt and planted this cool succulent in it,  Doesn't it look like steam coming off the coffee?  Now it's back in the garden with me.  :)

Is this the sweetest little planter you have ever seen?  I got her a a garage sale for only $4.00.  I simply dropped an air plant in her and Ta-Da she was done.  These are probably the only plants that are easier than Sedums!!!  I even had two plants bloom for me this year.  :)

Don't ask me why but I just have a thing for old colanders...Thank goodness they make good planters!!


Usually I plant several different varieties and then add some stones, shells and or sea glass for just a little more interest...


Here's 3 finishes planters on my outdoor table..

The "Sea Urchins" also came from a garage sale..somone's dad made them out of nails....just couldn't leave them behind.  :)

I will be linking up to many of the parties on my side bar.
Thanks for stopping by!!
Denise

I almost forgot to mention...The best thing about these little plants is, that they are so easy to propagate..
just break off a "pup" from the mother plant and stick it in the dirt!!