Wednesday, November 23, 2011

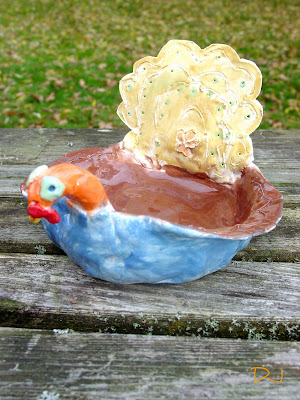
Too Cute Turkeys Bowls...How Too...

Here's a whole Gaggle... Ummm  Herd...No Flock...that's it...of Turkey Bowls that my "art kids" made....Get it Turkey bowl...Like the football game...Tee-Hee.   I planned on posting them much earlier but life got busy!  :0


They were done by a little group of grade school kids that I teach after school art to...Grades  K-5.


I love the colors they choose and


how each one has it's own personality!!!
So here's how they're made:


We start out with a ball of clay ( terracotta is my favorite for this project) and make  simple pinch pot with very thick sides.


Then we pull up the neck and head out of the original pot...My theory is the less pieces you have to attach the less chance you have of them falling off when the clay dries....


With that being said some of the kids did make the neck and head and then attached them to the body and none of them fell off.  :)


I did use another small ball of clay to make the tail and then attached it by scoring both sides then adding a little water and pressing them together.


The eyes are little round balls of clay that are pushed in with the end of a pencil.
I also used a pencil to draw the front feathers in along with the eyelashes.
I fired them in the kiln and the next week the kids painted them and I fired them one more time.


Here is my finished turkey...And


Better yet the kids!!


Well that's it, a real simple fun Turkey, that are already a cherished treasure!
Happy Thanksgiving!
Denise

Tuesday, November 1, 2011

Jalapeno Pepper Jelly


Being a good cook is certainly NOT something I'm known for!!
But I do have a few...Ok...VERY few good recipes and I today I am going to share one of them with you....
This is the one I am most famous for and believe it or not everyone wants a couple of jars of these babies!
Ya...and I am the one who makes them...cool huh!


In my family it wouldn't be the Holidays without Pepper Jelly!!! This is because once you have spent an afternoon canning your pretty much done....It is such a quick fix for any party...pour a jar over a brick of cream cheese serve with crackers,,,and instant hit!!  Which is, of course, why I bring it to almost every party...people have come to expect it now...I can always bring something else...but I better have Pepper Jelly too!  :)


Sooo Here's My Recipe for:

JALAPENO PEPPER JELLY

6  Jalapenos
2  Med. size Peppers...One Green and One Red...Seeded and cut into pieces
1 1/2 Cups White Vinegar
1 (2oz) pkg Powdered Pectin
6  Cups Sugar

Prepare 6 half-pint canning jars.  Cut stems off jalapenos then  chop and place in food processor or blender.  (For a milder batch of jelly remove about half the seeds).  Remove stems, seeds and chop red and green peppers adding them to processor, along with 1/2 cup of the vinegar.  Whirl until finely chopped.
Pour into 5 quart pot, using remaining 1 cup vinegar to rinse processor or blender, then add to pot.  Stir in pectin and bring to full rolling boil over high heat, stirring constantly.  Add sugar and continue stirring until mixture comes to a boil again.  Let boil exactly 1 minute, stirring constantly.  Remove from heat and skim off foam.  Pour jelly quickly into hot jars, filling to about 1/8th inch from top, wipe mouth, set lid on and gently screw down.

Love the color of the red and green peppers!

This year I made little tags with a Vintage Pepper Image I got from The Graphics Fairy ...If you haven't visited her You probably should!!!  ;)


I uploaded her image into picnik and added the background color and the letters and then pasted it into word...printed and ta-da this is what I got. 

Well, that's it in a "nut shell"...If you have any questions please e-mail me...I would be happy to answer them...I wrote the recipe with some presumption that you have made jelly before but if your a "Newbie" it might not be clear enough.

Have a Groovy week and MAKE SOME JELLY!
(I will be linking up to many of the parties on my side bar)
Denise

Wednesday, October 26, 2011

Up-Dated Book / Magazine Rack

Finished...One Magazine / Book Rack (FINALLY)!  :)
I don't know about the rest of you but once school started I've had a hard time keeping up...or maybe it's that ridiculous goal of getting 3 stockings done a week  (last week I only managed two)...could be all those Volleyball games of Autumns.  Awe..I do enjoy watching her play!!!

But I DID get this little baby done...check that off my list (happy sigh)! 
And I must say I'm pretty pleased with it!
I used homemade chalk paint (because the price of the other is just not an option...someday maybe).


Anyway Jane at Mamie Jane's was my inspiration...She painted one white and wrote "READ" at the top...Too Cute!!  I have been looking for one ever since I pinned hers!!


My twist on the idea was to put a TV on it, suggesting reading, instead of watching...
And of course because I LOVE CHALKBOARDS I did the inside of the TV with Chalkboard paint.
(Did You know I make little chalkboard Pendants out of clay and sell them on t Etsy??  I'll have a new batch out next week).


So this is what I started with.  I got it at my local Good Will for $5.00.
The metal sides were Hunter Green so the first thing I did was...


Tear it apart and spray paint the metal sides Flat Black.  I used  KRYLON Dual Paint +Primer...
And I have to say I LOVE IT!  Two coats and I was done.  :)


I then whipped up a batch of "Chalk Paint" by adding Plaster of Paris to a sample BEHR's "White Truffle"...
After painting I went on line and searched images for a vintage TV...I choose this one because of it's simple lines.


I used my son's paint pens and a sharpie for the silver and the thin lines....
and Krylon Chalkboard Paint (left over from a project or two ago) for the TV screen. 


After painting I did my best to distress it.  This is something I don't quite have the hang of ...but I'll keep working on it!


And  side view...


I used a vintage green to add some color to my TV and added water to acrylic brown  paint for the front.

Well...That's my project for the week...
Thanks for visiting and as always leave a message...I love to see who's stopped by!!
Denise

Oh yes...I'll be linking up to most of those wonderful parties on my side bar.  :)

Saturday, October 15, 2011

Time to get a KRACK-A-LAK-KIN

OH - MY - GOODNESS.... I just made a trip to BOTH G W's in my area and came home with a pile of sweaters...Now I have got to get Kraken!!!  The Holidays are almost here and I am way behind in my little Stocking Business!!


I found a ton of pastels (which are harder to come by) but make such lovely stockings...that is if I don't shrink them to far!  :0

 I ended up with 17 sweaters....17 Yikes...I don't think there is anyway possible for me to get 17stockings done before Christmas...
But I will try!!
I have goaled myself to get 3 stockings done a week...This may not seem like much to you but they take longer than you might think!

 First of all I have to shrink or felt the sweaters...I then cut out the stocking shape and start my design....No two stockings are alike...That's what I love about making them...The Alien below is a special order for a wonderful customer...She had already purchased two Alien stockings for her babies and now wants one for herself (A Knitting Alien) and one for her Husband (A Tool Guy Alien)....Gotta get started on that one.....

The problem is...I'm somewhat of a moody artist...and I seem to be in more of a fall mood....so instead of making what I needed too...


I started working on a squirrel stocking....I wonder where I got the inspiration for this one?  :)


These pictures show you how I "build" a stocking...I have an idea in my head and just start cutting the shapes out of felted sweaters...I lay them out on the stocking adding and rearranging as I go.  When I like what I have, I pin it and start stitching...almost always by hand. 
For the cuffs I hit my stash of yarn laying different colors at the top of the design until I find the perfect combination...I then knit and it too is hand stitched to the top of the stocking.

Well that's where I'm at and why this post is so late.  :)
Anyone else in a "Pre-Holiday Panic" like me...
I would love to here from you and find out your managing to get it all done!!
Denise

Tuesday, October 4, 2011

Bench Job and Burlap Love

Hmmm...Where do I start?  I had this old bench that I really didn't love, but was useful (at my front door...as a catch all, for everyone in the family...Maybe I really don't need it)  :0   Anyway after being  inspired by all the wonderful benches I have seen here in "Blog Land'...(I must say I am dyeing to make one out of a old bed)!  I decided to give mine a face lift!!!


Sooo...


This is what I started with, an out dated beat-up oak bench...


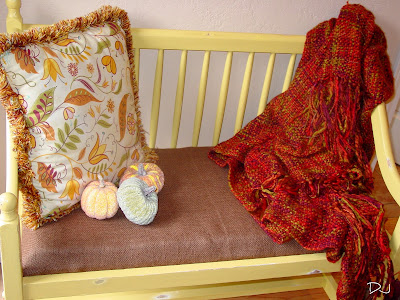
With a woven seat  that I never really cared for!!


A friend had given me a foam pad, that he had used for camping but was tired of storing.  (Yee-Haw...I knew there was a reason I took it)!  I placed the seat down on the foam and traced around it.  I then measure in 1" on 2 sides of it.   A long side and a short side...does that make sense?  This way the foam would be 1/2" smaller all the way around than the seat....I then cut it out....

I laid the seat and the foam on top of my burlap and cut it so there was enough fabric to cover the top, sides and be stapled to the bottom....I forgot to take pictures of this step but I think you can figure it out!!  :)


The next step was to paint the bench.  I first primed it with Zinsser Cover Stain primmer and then painted it this AWESOME color from Walmart's Glidden Brilliance Collection.  It's called "Dusty Gold"...Sometimes it's hard to tell if it's gold or green....BUT I LIKE IT!


The bench now brightens up the hallway and the burlap matches beautifully with the rug!! 


This is one of my favorite pillows, it sat on the bench before the re-do...I used it to help pick the color.


The wreath was made out of the same warm brown colored burlap....I cut it into strips 6" long by 1 1/2 inches wide and then tied them on to a wire frame...


I don't think my pictures do it justice...It really is quit lovely!!
( I edited them on picnik to make them look more interesting but I'm not sure it helped).

The leaves I just pinned on so I can change it with the seasons...I admit the wall need more work...maybe some Halloween bats on it!??
Anyway that's it for now.
Take care and check out all those link parties on my side bar...I will be hooking up to many of them!
TTFN
Denise

Monday, September 26, 2011

Mid Century Modern Table, by Lane

Well here it is...My first attempt at refinishing furniture...I found this baby at GW for $13.02 it was originally 19.99 but they were having a 40% off all furniture special...WOW
I saw it, grabbed it and carried it with me...I knew I didn't dare leave it behind!!


Like the "CREEPY" picture of Autumn?   More about that later!!
As I was headed to the check out line, some kind lady stopped and asked what I was going to do with it. When I told her my plans, she asked me if I had refinished furniture before...The truth is...For a moment I wanted to say yes and act,  just for once like I knew what I was doing...but true to my nature,  I was totally honest.....


Which was awesome, because she called her husband over who apparently does it all the time, he told me how he would go about getting this table back to it's former glory!  


Yes kids...It does always pay to tell the truth!! :)


So here is what it looked like when I bought it home that day...It had one real dark spot in the center of it...


Along with some white spots where the finish was mostly gone.....
The gentleman at the GW told me to use Formby's Furniture Refinisher to take off the finish...
It worked very well on most of it but did nothing to get the dark stain out...
So I tried bleach and a lot of sanding but only managed to lighten it some, I couldn't make it truly go away...
Afraid of ruining it, I decided enough was enough, and set it aside to stain it the following day....
Off I went to watch Autumns Volleyball game...While I was away two of my hens got in the house and ...
YOU ARE NOT GOING TO BELEIVE THIS ...
One of them...well...how shall I say this... LEFT HER MARK on my little table...and if that wasn't bad enough she had been eating Blackberries ...I went back to sanding... :( 


This is the stamp on the bottom of the table

I got MOST the "Chicken Mark" out and was feeling a little discouraged...
When a thought suddenly came over me that made me smile....


Whoever owned this table first left their mark on it...maybe I had no right to take it away...It's part of it's history....as for my "mark", you really have to know where to look for it...But it's there...My little bit of history!!  :)


I stained it with a light walnut finish after conditioning it with Pre-Stain.  I was planning to put a Polycrylic finish on it but my husband talked me into using wax instead...


All and All I think it turned out pretty dang good ...If I may say so myself...the dark spot is hardly noticeable  and the contrast between the Oak boarder and the Walnut is truly gorgeous!!...


I just hope the wax is good enough to protect it from anymore "accidents"!!
Well that's my story...
Thanks for listening.  :)
I will be linking up to many of those wonderful parties on my side bar!
Denise


LinkWithin

Related Posts with Thumbnails

Autumn

Autumn
Autumn modeling a hat I knit for my etsy shop...What energy!!