Showing posts with label sewing projects. Show all posts

Wednesday, February 4, 2015

Easy Sew Pot Holders for Valentines and A Give Away

I went to the fabric store the other day just wanting some spring fabric...I wasn't even sure what I was going to do with it...maybe I would make a banner or pendant maybe some pot holders...maybe????
I just needed spring!!! With all my Christmas decorations down and no hope of snow (it's been so warm here in the Pacific Northwest) my house and myself were feeling a bit dreary.
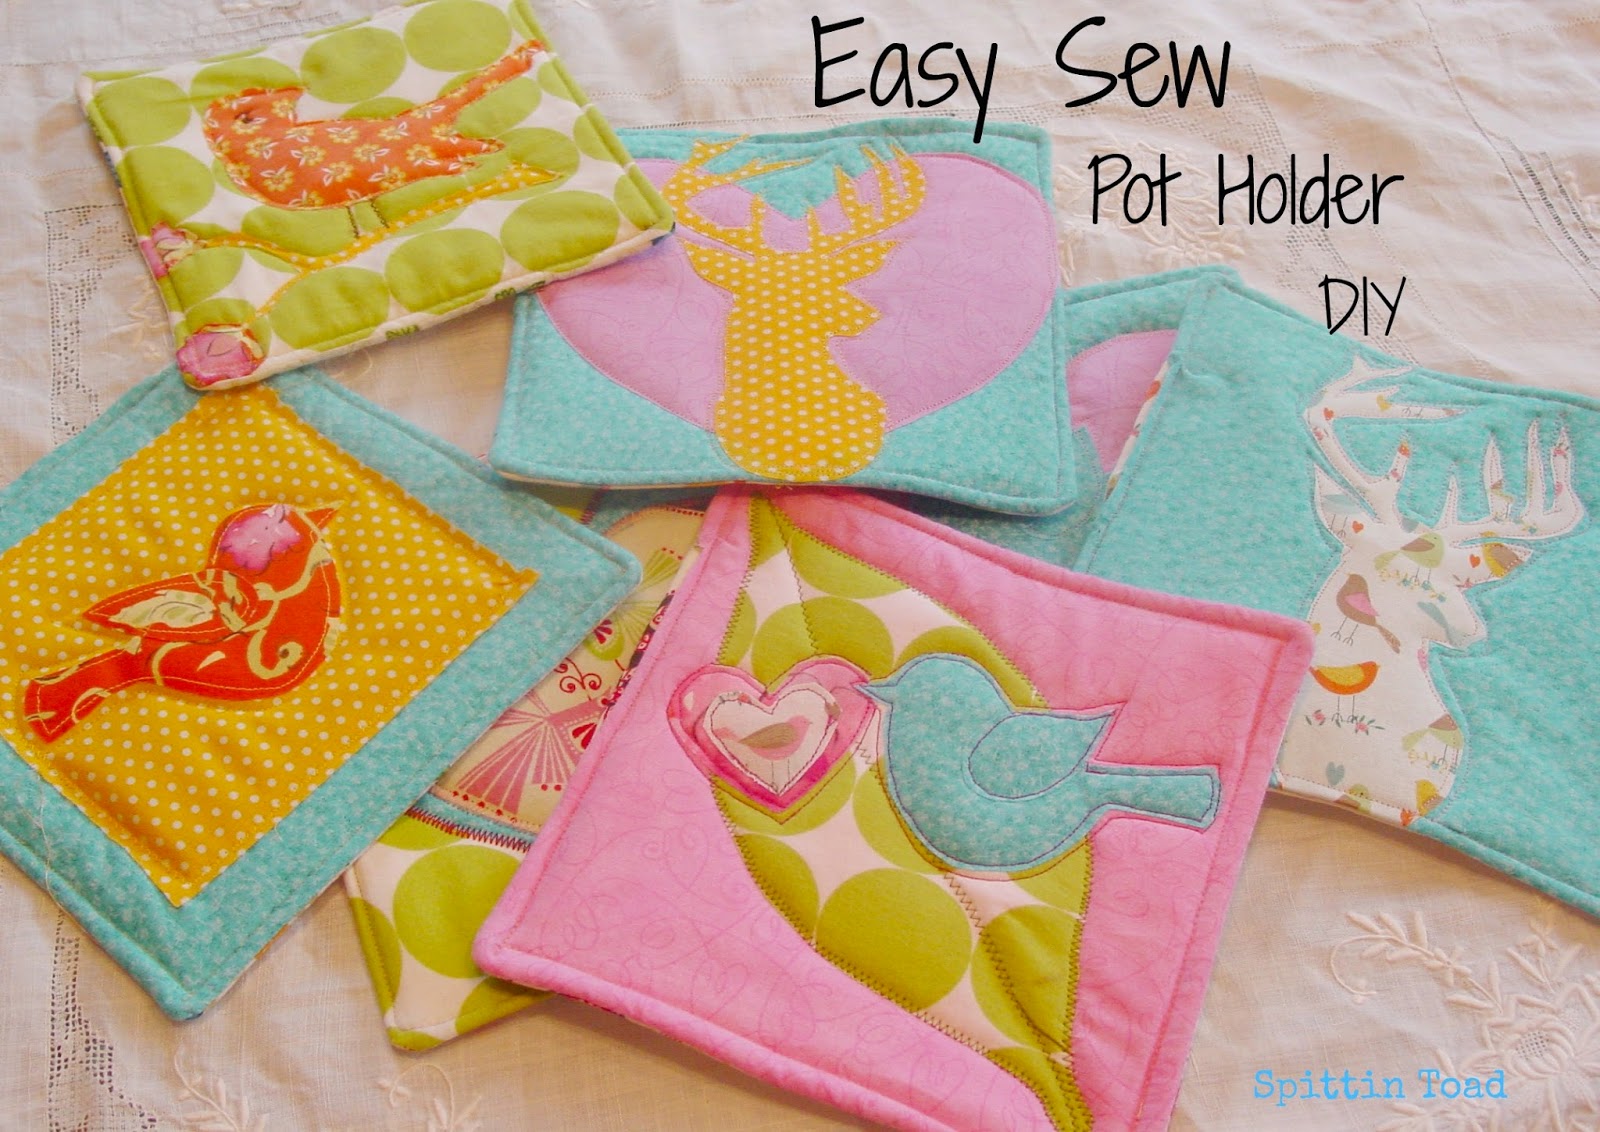

So I bought some "Happy Fabric" and decided to make pot holders (or do you call them hot pads?) for my friends for Valentines Day.  (Let me just say right now ...what a stupid idea!  They may be easy but they are a bit time consuming).


After washing the fabric I cut out a bunch of squares 8" x 8".

I laid  them out on my table to determine what pieces I wanted to put together.


I did an applique on one side and the left the other side plain...I had way to much fun putting the different fabric together!!!  I think that's my favorite part!


Using an iron on adhesive made the appliques easy...You just iron the adhesive to the wrong side of your fabric and then draw your design on the paper side...cut it out, peel the paper off, flip it over and iron it to the right side of your pot holder.


I laid my design out first before ironing....
In this case I sewed just the leaf on first and then ironed on the bird and the heart...


 Before stitching over the rest of the applique, I layered and sewed the pot holder together.

Here's how I did it..


I put two layers of my insulation fabric down (I like my pot holders thick.), then with the right side up I put the first fabric square on and then the 2nd one goes right side down...so that the the fabrics are right sides together and the padding is sitting under them. 


Then sew all around the square with an 1/2" seam allowance leaving about a 3 inch opening on one side to turn the square inside out...don't forget to trim the corners and excess seam allowance before you flip it.


Then sew around the edges and sew your applique on too.


I made these bright little birdies for my kitchen...


 And Guess What...


I made this set for YOU!!!!!


YUP...That's right...I'm giving away a pair of my hot pads to one lucky reader...

Okay, so it's not the lottery, but I do want to say thank you to all my faithful followers.  :)

I really do appreciate you always stopping by and it makes my heart goes thump thump when you leave a comment!!!

So this is my Valentine gift to you (well at least one of you).

Just leave me a comment and I will put you in the drawing for the hot pads and if your not following I would love it if you would!!! I have a ton of projects to share this year.  :)

I will put all the names in a hat and have one of the kids draw it a week from today....

Wed, February 11, 2015

Denise

And of course iIwill be linking up to many of the parties on my side bar...do check them out.


Monday, January 26, 2015

Hand Stitching Christmas

I know the holidays are over but I've been in a sewing mood lately...which is a good thing because I almost sold out on my applique Christmas stockings and I know I won't feel like working on them come spring.

Plus I had a couple of special orders that pushed me on ...


"Sew" the week between Christmas and New Years I cut out and pinned 7 stockings...
This way, with the designing done, all I have to do is choose a stocking and start stitching...
Just grab and go...  
 With a daughter in club volleyball, I'm on the road a lot and
there's way to much down time for a "get er done" person like me.  :)

The stockings keep my hands busy and help me feel like I'm still accomplishing something.


I finished this happy little monster at a Volleyball tournament in Eugene.


And started the Lab in between games in Tacoma.


The Santa and the Jeeps were finished one hour at a time on my lunch breaks at work...


This one was a special order for a lovely customer and her jeep loving husband.


 I was so pleased with the way it turned out I made a 2nd one to sell in my Etsy shop.
I think it will be a big hit...I should probably make more!  :)


How about you?  Are there any of you out there still working on Christmas or am I the only one???

 Denise
And of course I will be linking up to many of the parties in my side bar.

Tuesday, October 14, 2014

Frakinpillow an Easy to Sew Project

Today I'm sharing a project my daughter Autumn did.....


I call it "Frakinpillow."
Isn't it cute???


So here's what she did....
The size of Auto's pill form was 15"X 15" so the first thing she did is cut the canvas for the front 16"X 16"...This gave her room for a 1/2 inch seam allowance all the way around.


 After finding a image she liked on the internet, she used a pencil and lightly free handed the image onto her cloth canvas.  Using acrylic craft paint she simply filled it in....Easy Peasy!!


For the back she choose a fun bat fabric and used the envelope closure method...making the over lap large enough that we didn't have to put  buttons or a zipper in...(my goal was to make it a quick and easy project).  There are plenty of on line tutorials on sewing the back and we were in to big of a hurry to "get-er done" to take pics.....but a visit to Pinterest will give you more than enough instructions.  :)
Yup...She made a Candy Corn one too...Dang it's fun having a daughter!!...
LOVE YA BABE!!

Denise

I plan on linking to many of the parties on my side bar...check them out.
also including...

Saturday, January 4, 2014

Out of One Green Sweater...


I've been a sewing mood lately...(I'm a very moody person)  :)
Any-How...
I thought I'd share with you some projects I made out of  a wonderful mossy green sweater, that I felted in the washing machine...


I started buying and felting wool sweaters years ago to make Christmas stockings...


A few years later I stated making fingerless gloves from the sleeves...

Do you see why I call it Mossy Green?
Now the first thing I do is cut the sleeves to make gloves....
I sew around the wrist and of course embellish them.  :)


I managed to squeeze not one but two Wool Slugs out of the scraps....


Made a tree for my Christmas Alien to hold...


And it was the perfect color for the stems of my Burlap Pumpkins.


You will also find it as the center or the leaves of my wool flowers....


Oh yes...not much goes to waste...If you pay attention you will see tiny pieces in other projects down the road..

But that's it for today.

Peace, Love and Hippy Beads...
Denise
I'll be linking to may of the parties on my side bar..do check them out!


Wednesday, November 13, 2013

Burlap Pumpkins and Gift Bags

I promised I'd share these with you a long time ago...Opps...Sorry!!
I just got busy on other things and forgot...But I'm on it now and you still have time to make them for Thanksgiving!!


I think they would make lovely hostess gifts or use them in you own Autumn decorations!!


I sold them at the Market...but to be honest I didn't have very many made (I sold out)...just ran out of time!
(By the way isn't my little squirrel cute??  I got him at Walmart...Cheap). 


Danielle over at Thompson Family has such a lovely tutorial on making fabric pumpkins, I'm going to send you there to get the how to's;  Fabric Pumpkin Tutorial


I got the idea for the gift bags from Craftberry Bush...She has a delightful blog; just full of inspiration!!  If you don't follow her your really missing out.  :)  Her Blog is HERE.


Walmart had mums for a dollar...what is it with me and Walmart today??

Anyway I made my first bags to hold the little pot of mums, but then I got smart and deiced to make them just a tad bigger so one could put a small mason jar inside and use it as a vase.

These were so simple and fun to make plus you could make them for any season just by changing the stamped fabric in front.

So here's what I did;

                            1.)  Cut little squares out of muslin 2" X 2" and then stamped them
                                   with rubber stamps using acrylic paints and different fall designs.

                            2.)  Cut a piece pf burlap 14 X 7" 

                            3.)   Sew on patch with Zig-Zag stitch...

                            4.)  Fold the long edge down 1" and iron

                            5.) Fold right side together  and sew down side and bottom

                            6.)  Turn right side out and press...Ta DA... Your done!


Wouldn't these be cute with holly leaves or snowflakes stamped on them?!?

Well.....Thanks for stopping by!

Denise
I will be linking up to the parties on my side bar!  :)

Monday, February 18, 2013

Felted Wool Slug

I think I mentioned I've been in a sewing mood lately....but to be honest I'm in a crafting mood...I think maybe that's my great escape...When things get tough I get creative...It keeps my mind from hyper focusing on things I can do nothing about.  


My goal is to see how many things I can get out of a Mossy Green Wool Sweater that I felted....
and so far this little guy is my Favorite!


I started him on Super Bowl Sunday while my family was all up in the Bonus Room watching the big game.


Using my chalk pencil I drew his shape on a fold in the sweater...cut it out and opened it up....like when your cutting paper hearts.  I Needle felted the stems and the leaves and then sewed the button "flowers" on.


I planed on stuffing him with dried beans but there were none in the house to I opted for rice and of course some Lavender.


I love the way he turned out and would defiantly use the rice again!


Although when I made this little guy I thought of him as a Slug...He makes a great book worm too!  :)

I will be linking up to the many parties on my side bar...do check the out, they are full of wonderful ideas!
Thanks for visiting!
Denise 

LinkWithin

Related Posts with Thumbnails

Autumn

Autumn
Autumn modeling a hat I knit for my etsy shop...What energy!!